So you’ve got an idea for an enamel pin. Maybe it’s a funny character doodle, a phrase you love, or a moment from your favorite anime that just needs to be a pin. But then you hit that thought:
“Wait… do I need to be a professional designer to make this happen?”
The short answer? Nope.
Whether you’re a seasoned illustrator or someone who’s never touched a drawing tablet in your life, there’s a way for you to turn your idea into a beautiful enamel pin. Let’s break it down.
For Those Who Can Draw: Just Follow These Design Rules
If you already know how to draw, you’re halfway there. Designing enamel pins isn’t about changing your style—it’s just about fitting your art into a few simple manufacturing rules.
Here’s what enamel pin factories usually require:
- Closed lines only – All the areas you want to fill with color must be enclosed.
- Line thickness – Lines should be at least 0.3 mm thick so they can hold the metal outline during production.
- No gradients in standard enamel – Each area should be a single, solid color.
- Color matching – Try to choose solid colors that can match Pantone (PMS) colors for accuracy.
But what about more complex details—like blush, detailed eyes, or a starry sky background?
This is where a few special techniques come in—but don’t worry, you don’t need to learn them all.
 For example:
- Blush on cheeks – Since one area can only hold one color, we usually print a natural blush effect using UV printing. You just need to mark it clearly on your artwork—we’ll handle the rest.
- Complex eyes or clothing folds – If the metal outline would make them look messy, we can use screen printing instead. You don’t have to draw separate outlines—just label the color and placement.
- Gradients or dreamy backgrounds – Like night skies, star fields, or glowing effects? These can be done with printing techniques too. Just let us know what look you’re going for.

So if any part of the design feels too complicated to convert into “pin style,” just talk to us. We’ll suggest the most suitable way to make it work, and make sure your pin still looks awesome.
And if that sounds like a lot, don’t stress. Once you try it once or twice, it becomes second nature. And if you’re not sure how to prep your art for pins, most factories (like us!) can help clean up your file and get it ready for production. We’ve got your back.
For Non-Artists: Yes, You Can Design Enamel Pins Too
Now to the fun part—what if you don’t draw? Can you still design enamel pins?
Absolutely. You’ve got more options than you think.
Option 1: Use Beginner-Friendly Design Apps
You don’t need to be a pro. Apps like Procreate, Ibis Paint, and even Canva make it easy for anyone to design. They come with smooth curve tools, color fill functions, and tons of helpful features.
For example, in Procreate:
- Use a solid brush (around 0.3 mm thickness) to draw your outlines.
- Close off each area, then use the fill bucket to add color.
- Add black borders between color blocks—this simulates the metal lines in enamel pins.
- Save your image in high resolution, or ask your pin manufacturer to convert it into a vector file.
Don’t know where to start? TikTok is full of beginner-friendly tutorials on how to draw simple characters or icons using just a few brushes. You can follow along, use the same brush and colors, and end up with something really cool—perfect for your first enamel pin.
These tools are incredibly forgiving, and with just a few practice sketches, you’ll surprise yourself.

Option 2: Trace an Image You Love
Here’s a trick many beginners use—and it works beautifully.
If you’ve got a favorite image (say, a screenshot from your favorite anime or a comic panel), you can trace over it using a digital pen. As long as the image is copyright-safe (either your own work, public domain, or fully licensed), this is a fantastic shortcut.
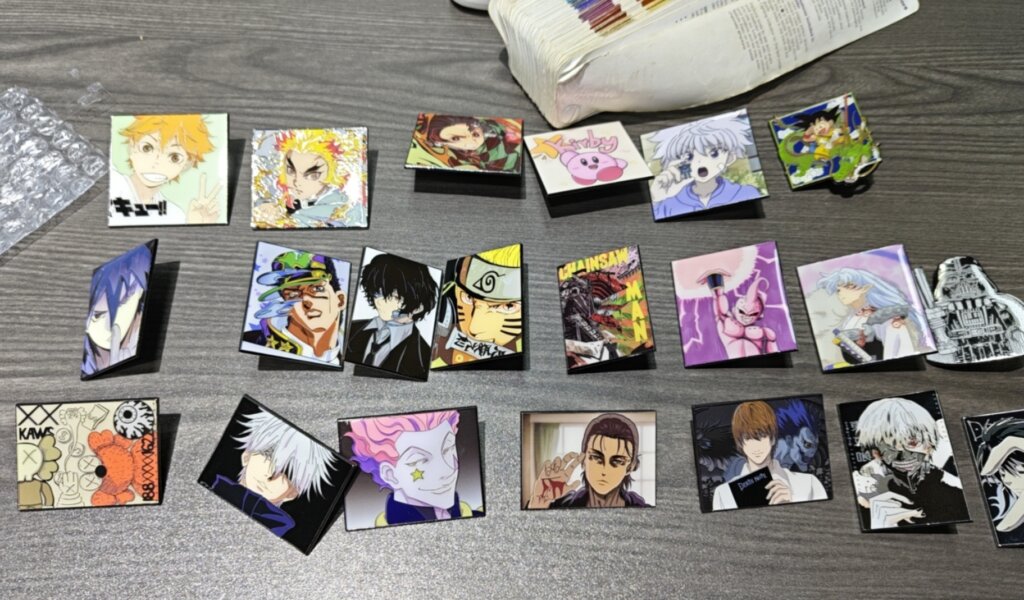
We’ve made tons of enamel pins that started this way. Some customers traced characters from iconic manga like Chainsaw Man and One Piece, cleaned up the lines, added solid colors, and sent it in. We turned their designs into both soft enamel pins (for that textured look) and hard enamel pins (for a smooth, polished finish). Both styles turned out stunning.

Chainsawman – soft enamel pin
So if drawing from scratch feels too intimidating, this is a great way to turn something you already love into a pin.
Option 3: Skip Drawing Entirely—Go with UV Printed Pins
Got a full-color illustration or photo that’s just too detailed to simplify into a line drawing? You don’t need to change a thing.
Just use UV printing.
UV printed enamel pins allow you to print the image directly onto the pin, with a protective resin layer on top. It supports gradients, shadows, textures—you name it.
One of our clients used this method to produce about 20 different pin designs using their original illustrations. The results? Bright, sharp, full of color, and zero loss in detail. Best of all, it’s quick and affordable.
If you want to design enamel pins without drawing or worry that your art is too complex for traditional production, UV printing is the easiest solution.
Final Thoughts: You Bring the Idea, We’ll Handle the Rest
Designing enamel pins is way more accessible than it seems. Whether you draw every day or haven’t sketched since grade school, your ideas are valid—and they can become beautiful pins.
At Factorypin, we’ve helped artists, fans, and first-timers all over the world turn their concepts into real enamel pins. We know the process inside and out, and we’re happy to help with design adjustments, file conversions, and even choosing the right production method.
So go ahead—pick up that idea you’ve been thinking about.
Your dream pin is just a few clicks away.
Comments on “How to Design Enamel Pins (Even If You Can’t Draw)”